Seamless & Secure: How to Activate Header-Based SSO for Virtual Machines via Microsoft Entra Application Proxy
In today’s hybrid working world, providing remote access to traditional on-premises or legacy web applications hosted on virtual machines (VMs) can be a headache. Historically, organizations relied on complex corporate VPNs or expensive reverse proxy appliances in a DMZ to bridge the gap.
Fortunately, Microsoft Entra Application Proxy (formerly Azure AD Application Proxy) changes the game. It allows users to securely access internal web applications using a public URL without opening any inbound ports on your firewall.
In this guide, we will break down what Application Proxy is, how to set it up, how to configure Header-based Single Sign-On (SSO), and how to quickly spin up a test script to verify that your HTTP headers are being passed properly.
What is Microsoft Entra Application Proxy?
Microsoft Entra Application Proxy is a cloud-based service that provides secure remote access to on-premises web applications or applications hosted on cloud infrastructure VMs (like Azure IaaS, AWS, or private clouds).
How It Works Behind the Scenes
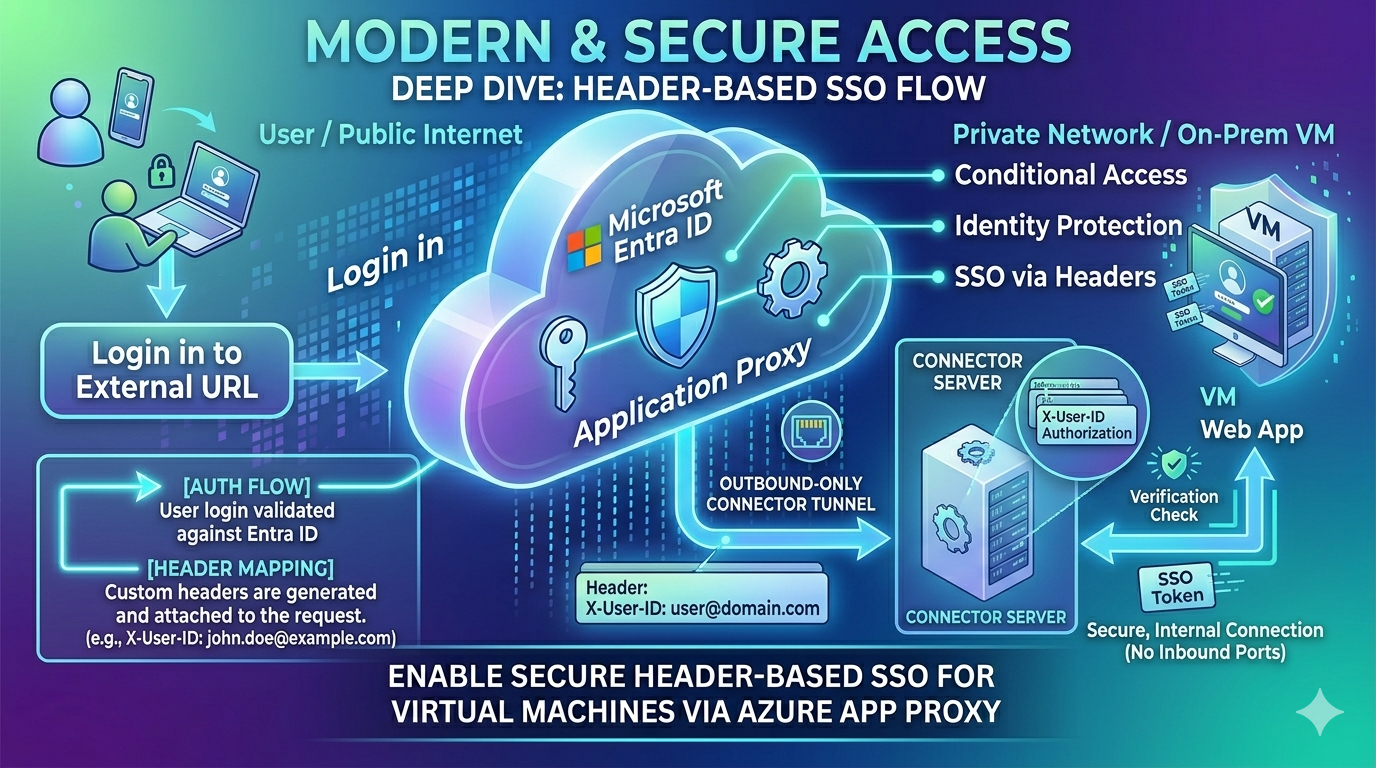
Instead of requiring an inbound path through your firewall, it relies on a lightweight agent called the Private Network Connector installed inside your network. This connector establishes a permanent outbound-only connection to the Entra ID cloud service.
When a remote user hits the external URL of your application:
- They are redirected to the Microsoft Entra ID sign-in page for authentication.
- Entra ID enforces any security rules you have active (like Multi-Factor Authentication or Conditional Access).
- Upon successful login, the App Proxy cloud service relays the request to your on-premises connector.
- The connector passes the request to the internal VM application and routes the response back to the user.
Main Connection Steps
Setting up Application Proxy involves installing the connector agent, publishing the application, and mapping it to your VM.
Step 1: Install the Private Network Connector
- Sign in to the Microsoft Entra admin center as an Application Administrator.
- Navigate to Identity > Applications > Enterprise applications > Application proxy.
- Click Download connector service and install it on a Windows Server machine that has network access to your target VM.
- During installation, log in with your Entra ID admin credentials to register the connector to your tenant.
Step 2: Publish Your Application in Entra ID
- Navigate back to Enterprise applications and click New application.
- Select Add an on-premises application.
- Configure the following critical settings:
- Name: A friendly name for your app.
- Internal URL: The local address used inside your network to reach the VM (e.g.,
http://my-internal-vm:8080/). - External URL: The public-facing URL generated by Microsoft (or your own custom verified domain).
- Pre-Authentication: Set this to Microsoft Entra ID (this ensures users must authenticate before hitting your network).
Step 3: Assign Users
By default, no one can access the application. Go to Users and groups within your newly created Enterprise Application and assign the users or groups who are authorized to access the virtual machine.
Important Points to Consider
Before finalizing your architecture, keep these critical operational limits and best practices in mind:
- Licensing Requirements: Using Application Proxy requires a Microsoft Entra ID P1 or P2 license for users accessing the app.
- Internal Routing Restrictions: Application Proxy is explicitly designed for remote/external users. It is not recommended or optimized for handling traffic originating inside the same local network where the VM resides.
- Network Latency: Ensure that the server hosting your Private Network Connector is geographically close to the application VM to minimize internal network latency.
- Lock Down the VM Server: To prevent users from bypassing Entra ID controls, configure your VM firewall or network security groups (NSGs) to only accept traffic originating from the Connector server's IP address.
How to Set Up Header Parameters in Application Proxy
Many legacy web apps don't speak modern authentication protocols like SAML or OpenID Connect. Instead, they expect the reverse proxy to pass user details (like username or email) through raw HTTP headers. Here is how to map those claims:
- In the Entra admin center, open your published Enterprise Application.
- From the left-hand navigation menu, click on Single sign-on.
- Select Header-based as your single sign-on method.
- Click the edit pencil icon under the Headers section.
- Click Add new header to create a custom mapping:
- Header Name: Enter the exact header key your application expects (e.g.,
X-Remote-UserorAuthorized-Email). - Source Type: Select Attribute (or Transformation if you need to manipulate strings).
- Source Attribute: Choose the Entra ID claim you want to map, such as
user.userprincipalnameoruser.mail.
- Header Name: Enter the exact header key your application expects (e.g.,
- Save your settings. The connector will now inject these HTTP headers into every request it forwards to the VM application.
Testing Your Setup: Creating a Verification Server
When setting up header-based authentication, things don't always work perfectly on the first try. To troubleshoot or verify that Azure is successfully injecting your configured headers, you can spin up a simple web script on your VM that intercepts the request, logs the headers, and displays them back to you.
Security Note: This testing script prints out raw HTTP headers (which may contain user names or emails) for verification purposes. Ensure it is only deployed in a secure, isolated testing environment and removed before moving to production.
Integrating Nginx and Flask inside a Docker container is the gold standard for deploying Python web applications behind Microsoft Entra Application Proxy.
Here is how to set up a Dockerized Flask and Nginx testing environment, followed by an explanation of why Nginx is essential for production deployments.
Step-by-Step: Setting Up the Docker Test Environment
This setup uses Nginx as the front-facing web server to catch the headers from Azure Application Proxy, which it then safely passes to a Flask application running via Gunicorn (a WSGI server).
1. Create the Flask Application (app.py)
This script acts as our verification server. It intercepts incoming HTTP requests and prints out the headers injected by Azure.
Python
from flask import Flask, request, jsonify
import json

app = Flask(__name__)

@app.route('/')
def index():
    # Capture all incoming HTTP headers
    headers = dict(request.headers)

    # Format as an HTML page for easy browser viewing
    html = f"""
    <html>
        <head><title>Header Verification</title></head>
        <body style="font-family: sans-serif; margin: 40px;">
            <h2>🛡️ Containerized Header Verification Server</h2>
            <p>Below are the HTTP headers received by Flask via Nginx:</p>
            <pre style="background: #f4f4f4; padding: 15px; border: 1px solid #ccc; overflow: auto;">
{json.dumps(headers, indent=2)}
            </pre>
        </body>
    </html>
    """
    return html

if __name__ == '__main__':
    # Flask's built-in server (only used if run directly, not via Gunicorn)
    app.run(host='0.0.0.0', port=5000)
2. Configure Nginx (nginx.conf)
Create an Nginx configuration file. Crucially, we use proxy_pass to route traffic to Flask, and we explicitly instruct Nginx to preserve and forward headers.
Nginx
server {
    listen 80;
    server_name localhost;

    location / {
        proxy_pass http://127.0.0.1:5000; # Routes to Gunicorn/Flask

        # Essential headers for reverse proxy tracking
        proxy_set_header Host $host;
        proxy_set_header X-Real-IP $remote_addr;
        proxy_set_header X-Forwarded-For $proxy_add_x_forwarded_for;
        proxy_set_header X-Forwarded-Proto $scheme;

        # Ensure Azure Application Proxy custom headers are passed through
        proxy_pass_request_headers on;
    }
}
3. Create the Dockerfile
We will use a lightweight Python base image, install Nginx, install our Python dependencies (flask and gunicorn), and use a startup script to launch both services simultaneously.
Dockerfile
FROM python:3.11-slim

# Install Nginx
RUN apt-get update && apt-get install -y nginx && rm -rf /var/lib/apt/lists/*

# Set up working directory
WORKDIR /app

# Copy application files
COPY app.py .
COPY nginx.conf /etc/nginx/sites-available/default

# Install Python requirements
RUN pip install --no-cache-dir flask gunicorn

# Expose port 80 to the Azure App Proxy Connector
EXPOSE 80

# Start both Gunicorn (Flask) and Nginx
CMD gunicorn -b 127.0.0.1:5000 app:app & nginx -g "daemon off;"
4. Build and Run the Container
Run these commands in your terminal to build the image and spin up the container on your Virtual Machine:
Bash
# Build the Docker image
docker build -t app-proxy-tester .

# Run the container, mapping port 80 of the VM to port 80 of the container
docker run -d -p 80:80 --name proxy-test-container app-proxy-tester
❓ Why Use Nginx in Front of Flask?
When building simple proof-of-concepts, running Flask by itself is fine. However, in a production architecture—especially one integrated with an enterprise proxy like Azure Application Proxy—Nginx is practically mandatory.
Here is why Flask needs Nginx:
1. Flask’s Built-in Server is Not Production Ready
If you run a raw Flask app (flask run), you will see a stark warning: “Do not use it in a production deployment.” Flask's built-in server is single-threaded and synchronous. If two users click a link at the same time, one user's request hangs until the other finishes. Nginx acts as a high-performance Reverse Proxy that can handle thousands of concurrent requests seamlessly.
2. Security Hardening and "Header Sanitization"
When using Header-Based SSO, malicious actors might try to spoof headers (e.g., manually injecting an X-Remote-User: [email protected] header into an HTTP request to bypass security).
- Nginx allows you to explicitly drop, overwrite, or sanitize incoming headers before they touch your application logic.
- By configuring Nginx properly, you ensure that the only headers Flask trusts are the ones verified and passed down by the Azure Application Proxy Connector.
3. Handling Static Content Efficiently
Flask is great at processing Python logic, but it is incredibly slow at serving static files (like CSS, JavaScript, or images). Nginx is written in C and is optimized to serve static assets directly from disk almost instantly, completely bypassing Python and freeing up Flask to handle user authentication and logic.
4. SSL/TLS Termination
If you plan to use custom domains with HTTPS internally, Nginx can manage your SSL certificates (like Let's Encrypt). It handles the heavy cryptographic processing of decrypting HTTPS traffic at the perimeter, passing clean HTTP traffic to your internal Flask container.